Publishing to Connect using GitLab CI/CD
Overview of Deploying to Connect
Connect hosts a variety of data artifacts with different development life cycles. Whenever you want to publish one of these data artifacts to Connect, there are three paths you can follow:
- Hands-on deployment process from within a development environment
- Git-backed deployment within Connect
- Programmatic deployment
This page focuses on the third option, programmatic deployment using GitLab CI/CD as a continuous integration and deployment pipeline. Continuous integration (CI) is the practice of automating the integration of code changes. That automation can entail running different tests or other pre-deployment activities. Continuous deployment (CD) is the practice of automating the deployment of code changes to a test or production environment. Many popular code hosting providers and independent software companies offer CI and CD services. These pipelines allow you to build for specific operating systems/environments, integrate tests and publish to Connect from private repositories without a service account.
The following section examines the deployment of a Shiny application to Connect using GitLab CI/CD.
GitLab CI/CD Example
Demo GitLab Repository: https://gitlab.com/tnederlof/shiny-app-demo-cicd-gitlab
The first thing to consider is how to manage the R packages as dependencies within the CI/CD service. One solution is to do a one-by-one installation of every package the Shiny app uses, however, this gets cumbersome as the app grows bigger. To simplify package management of the environment, it is recommended to use the renv package. This package helps reproducibility because, for all packages used by your project, it saves both the package version information and the repository location(s) where you installed the packages from so that it can restore the environment on other computers. You use renv in this deployment process to maintain consistency between the development and build environments.
Without renv:
install.packages(c(“shiny”, “jsonlite”, “ggplot2”, “stringr”))With renv:
renv::snapshot() #Development Environment
renv::restore() # CI
To learn more about renv, visit the package documentation website.
Below you can see how the files are organized in the Demo GitLab repository.
.
├── .Rbuildignore
├── .Rprofile
├── .gitignore
├── .gitlab-ci.yml
├── README.md
├── app
│   ├── app.R
│   └── manifest.json
├── deploy-to-connect.sh
├── install-pandoc.sh
├── renv.lock
├── set-rspm.sh
└── shiny-app-demo-cicd-gitlab.Rproj

1 directory, 12 files
The Shiny application is contained in app/app.R.
The main file of interest is .gitlab-ci.yml. This file defines the CI/CD pipeline and is set up to run on any push to the main branch. First, it setups the proper environment, including restoring the renv environment. Second, it publishes the Shiny application to Connect using the Connect API.
      stages:
        - all

      image: posit/r-base:4.5.1-noble

      test_and_deploy:
        stage: all
        script:
          - apt-get update && apt-get install -y libcurl4-openssl-dev libssl-dev curl jq
          - /bin/sh install-pandoc.sh
          - /bin/sh set-rspm.sh
          - rm .Rprofile
          - R -e 'install.packages("renv")'
          - R -e 'renv::consent(TRUE)'
          - R -e 'renv::restore()'
          - R -e 'rsconnect::writeManifest("app")'
          - chmod +x ./deploy-to-connect.sh
          - /bin/bash deploy-to-connect.sh
The rest of this article reviews the file’s contents so you understand in detail what is happening.
The beginning of .gitlab-ci.yml lists each stage of the pipeline. In general, multiple stages can be created for more complex pipelines to separate build, test, and deployment steps, however in this example, there is only one stage: all.
      stages:
        - all
Next, image sets the container image to be used to run the pipeline. We can use the posit/r-base:4.5.1-noble image to provide a container with R installed since this CI/CD pipeline will be running R code and deploying a Shiny app. Any Docker Hub image may be used and for a full list of available images with versions of R pre-installed visit the posit/r-base repository. Alternatively, images can be stored in a GitLab Container Registry, which would increase the speed of some pipelines.
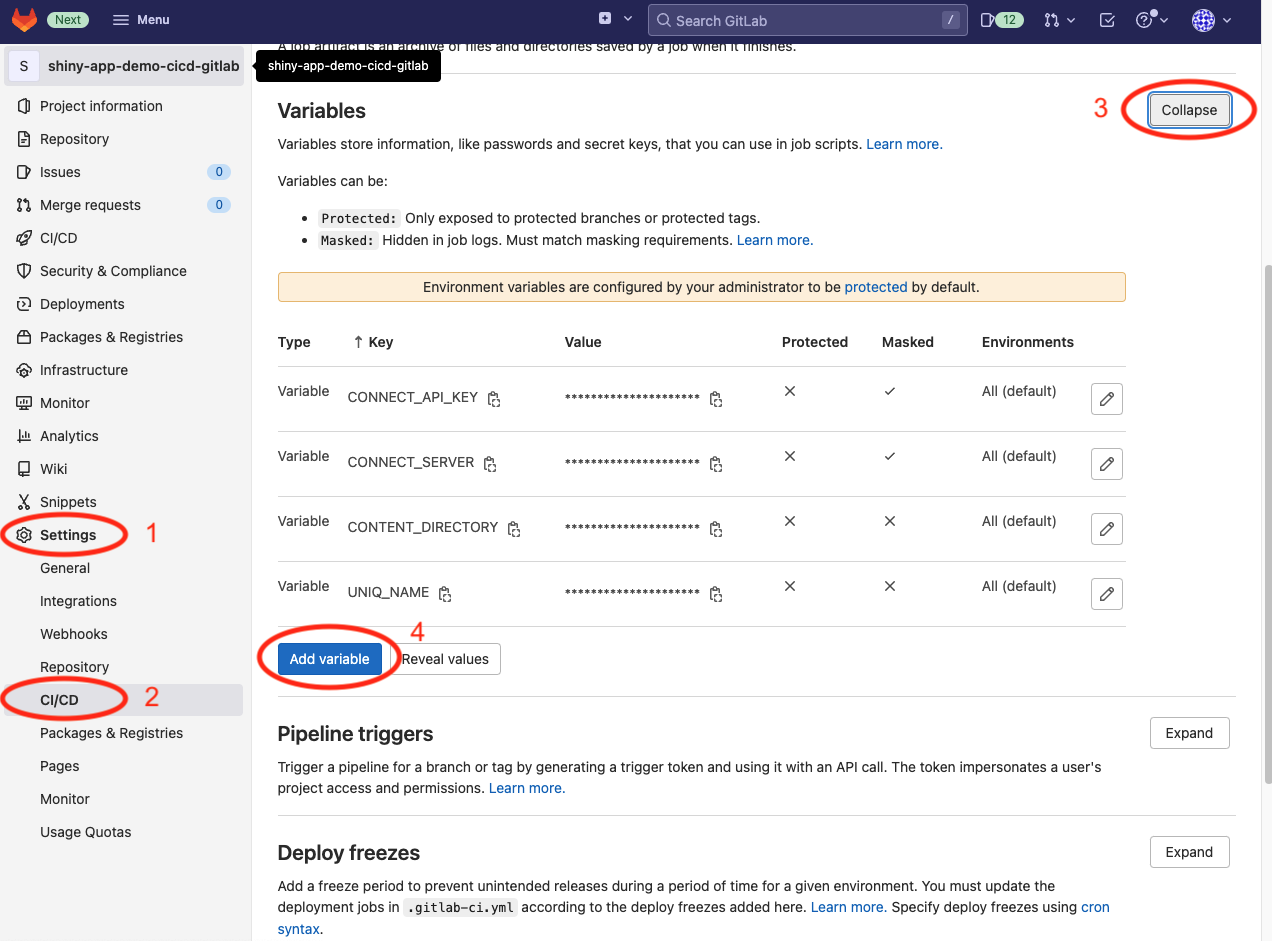
image: posit/r-base:4.5.1-nobleTo successfully deploy to Connect this pipeline will need several environment variables. CONNECT_SERVER, CONNECT_API_KEY, UNIQ_NAME, and CONTENT_DIRECTORY should be setup at the pipeline level by going to Settings, CI/CD, scrolling down to the Variables section, and adding each variable as a key/value pair (note: for this example to run all variables should NOT be marked Protected but the CONNECT_API_KEY should be “Masked”). The screenshot below illustrates where to go in the GitLab settings.
The rest of the .gitlab-ci.yml file determines a series of steps to be performed, the last of which deploys the Shiny application to the Connect server. All of these steps are specified as bash commands under script:.
The first three steps install system dependencies and set up Package Manager as the default R repository for faster package installation from binaries. If your organization does not have Package Manager, it is recommended to use Posit’s Public Package Manager for access to binaries.
      test_and_deploy:
        stage: all
        script:
          - apt-get update && apt-get install -y libcurl4-openssl-dev libssl-dev curl jq
          - /bin/sh install-pandoc.sh
          - /bin/sh set-rspm.sh
The next four steps restore the environment. First, the .RProfile is removed to avoid conflicts with renv. Then we install renv and restore the renv environment. Using renv is recommended rather than manually installing packages, as mentioned at the beginning of this article.
      test_and_deploy:
        ...
        ...
          - rm .Rprofile
          - R -e 'install.packages("renv")'
          - R -e 'renv::consent(TRUE)'
          - R -e 'renv::restore()'
After the proper environment is set up we create the manifest.json file required by Connect for deploying content programmatically. The directory argument is set to $(CONTENT_DIRECTORY), which specifies the directory where our content app.R is located. The value for this variable, “app” was set at the beginning of the pipeline.
      test_and_deploy:
        ...
        ...
          - R -e 'rsconnect::writeManifest("app")'
The last two steps are to set permissions and run the deploy-to-connect.sh script, which interfaces with the Connect API and deploys the Shiny application.
      test_and_deploy:
        ...
        ...
          - chmod +x ./deploy-to-connect.sh
          - /bin/bash deploy-to-connect.sh